Friday, December 21, 2012

Monday, December 17, 2012
Project: NEED and IDEA. Insects
You already know that the project for this course is going to be a robot. Juan (another technologies teacher) has been working hard in a prototype and now we got it. It works!. So now, we have to begin our process step by step.

NEED
Our first need is to design a COSTUME for the robot. We, the teachers, have analysed the need or problem and we have agreed to construct an INSECT. So, the first thing you have to do is to STUDY INSECTS, their anatomy, types of insects, colors, shapes...

 |
| Insect anatomy scheme, by Piotr Jaworski, PioM; 17 V 2005r., POLAND{{cc-by-sa-2.0}} |
Parts of an insect.:
A - Head
B - Thorax
C - Abdomen
1 - Antenna
4 - Compound eye
11- First wing
12- Second wing
23- Tarsus
24- Tibia
25- Femur
26- Trochanter
IDEA
In this stage you will have to propose one or several solutions and begin thinking about materials. Your team will have to agree and choose the best solution to be built.
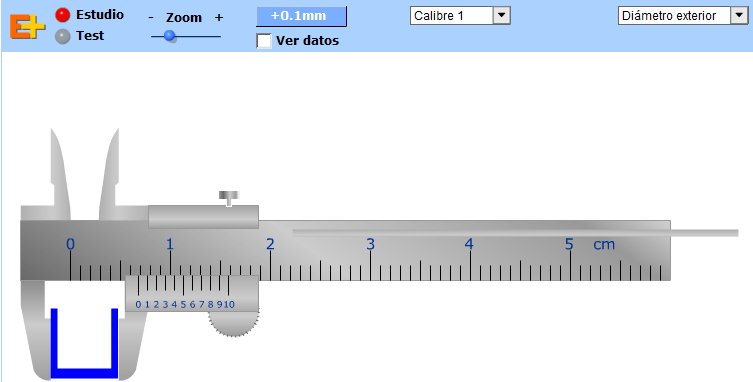
Measuring with a ruler and a caliper
Measuring with a ruler:
Measuring with a caliper:


Measuring with a caliper:

- Photocopy using a caliper. When finished and corrected, stick it in your notebook.
- Calibre, in Educaplus.org. First, go to "Estudio", then do the "Tests".
- Now you are ready to do the following task:
 |
| 1,5Volts motor and an SPDT (single pole double throw) switch with a metal lever |
- Perspective views > Measure the pieces and take notes over your sketches.
- Views > Dimmension the views of the pieces over the sketches. Remember you must not repeat dimmensions.
- Finally, you will have to create a FAIR COPY (use rulers, compass, 2H pencil, black feltpen) of the views with dimmensions. Use an appropriate scale for your drawings.
Do a good job. These documents will be part of your final Technical Report!
Scales
REDUCTION SCALE
ENLARGEMENT SCALE
- TECNO 12-18. Reduction Scales. To understand and study.
Do the questions abut reduction scales. You will need a calculator.
ENLARGEMENT SCALE
- TECNO 12-18. Enlargment Scales. To understand and study.
Do the questions abut reduction scales. You will need a calculator.
Dimensions
Dimensioning a drawing means adding dimensions, notes and lines to a drawing.
Architectural, Engineering and Design drawings must be able to tell you everything you need to manufacture a component or assemble several components together.
Basic Types of Dimension Used in Engineering Drawings.
You have to know: (pay attention to Glossary)

- Types of lines. (projection/extension, dimension and leader lines).
- Types of dimensioning a drawing (parallel, running, chain, and combined).

- Dimensioning circles.
- How to dimension a radius. (Interactive activity).
- Notes.
- Review dimensioning. What not to do.
- Dimension exercises. Just copy the views of 4 objects with its main dimmensions on the grid template.
Tuesday, December 4, 2012
The first parts of your Robot!
Now you are ready to do the following task:
|
| 1,5Volts motor and an SPDT (single pole double throw) switch with a metal lever |
- Sketching of some pieces of your future ROBOT! Do perspective views.
- Sketching views (front, plan and side views) of the same pieces.
Do a good job. These documents will be part of your final Technical Report!
Isometric perspective drawing
Templates for isometric perspective drawings

- TECNO 12-18. Drawing in isometric perspective 1.
- TECNO 12-18. Drawing in isometric perspective 2.
- TECNO 12-18. Drawing in isometric perspective 3.

- TECNO 12-18. Drawing in isometric perspective 5.
Wednesday, November 28, 2012
Views of objects
Views of objects = Orthographic Projection = Dihedral System (Sistema diédrico)
European System
REALIA:
Easy 3D model to understand how views are obtained:

Ortographic Views - European system on PhotoPeach
- Exercises with photocopies (Remember they have to be stuck in your notebook when finished).
- TECNO 12-18. Views of an object 1.
- TECNO 12-18. Views of an object 2.
- TECNO 12-18. Views of an object 3.
- TECNO 12-18. Views of an object 4.
Monday, November 12, 2012
Basic drawing tools and materials
- Basic drawing equipment A.
- Basic drawing equipment B.
- Basic drawing equipment C.
- Basic drawing equipment D.
- Titles, subtitles and labels: Improving the standard of presentation of design sheets.
REALIA:


VOCABULARY TASK
- Vocabulary exercises 1, 2 and 3. Just in case you need a new copy. Use links above to complete the exercises. Common office equipment is not in these pages, so do it by yourself or search on the Internet (I think they are only 3 or 4 items). Please, only short and easy descriptions, remember you have to learn them. The deadline is December 10.
Paper sizes
- The International Standard ISO 216 (International Organization for Standardization), sets out the common paper sizes used around the world.
- 161 countries from around the world are members of the organisation.
- The metric system of paper and card sizes are shown below.
- All ‘A’ sizes are double the previous size, with A0 being the largest.
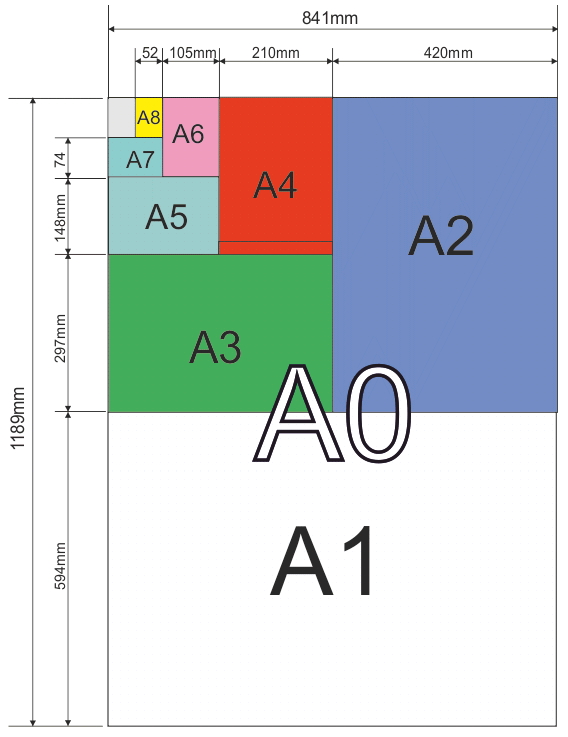

- Paper sizes task. page 3. Page 3 should be done in your notebooks.
- REALIA: Craft Practice Using sheets of paper (A4). Create A3, A2, A1, A5, A6, A7... formats.

Sunday, November 4, 2012
Friday, November 2, 2012
First exam - Technological Processes and Computers
 |
| November, 7th |
The first Technologies exam is beeing your worst nightmare this Halloween. It shouldn't be like that. Don't be so scared about it!.
You only have to review everything we have been working with in our classes (regular class, workshop and computer lab). You have got everything handwritten or stuck in your notebooks and on this blog. We have been working with the same contents so many times and through so many different activities...! Just be sure you know the technological processes stages, health and safety rules, signs and computer basic components.
Don't study things by heart! Just go over what we have worked with and you will be able to answer the short questions of this first exam.
It would be a good idea to bring:
- Blue or black pen
- Pencil (HB)
- Ruler
- Compass
- Coloured pencils (red, blue and yellow)
If you have any question, please post a comment instead of sending me an email so that all your classmates could share the answers. I've just published two comments with your questions and answers about the exam and the homework for next Monday.
Thursday, October 25, 2012
Your tasks: Health and Safety rules
1st A:
- Inés A.'s Voki. Ok
- Lorca P.'s Voki: Ok

- Clara F.'s Voki. Ok
- Miguel F.'s Voki. Ok
- Macarena's Voki. Ok
- Luna O.'s Voki. Ok
- Sara de I.'s Voki. Ok
- Alejandra V.'s Voki. Ok
- Mariana S.'s Voki. Ok
- Sandra R.'s Voki. Ok
- Andrea P.'s Voki. Ok
- Paula H.'s Voki. Ok
- Lucía C.'s Voki. Ok
- Jaime F.'s Voki. Ok
- David S.'s Voki. Ok
- Eva A.'s Voki. Ok and with your voice!!
- Fabián M.'s Voki. Ok
- Juan M.'s Voki. Ok
- Andrea B.'s Voki. Ok
- Jorge S.'s Voki. Ok
- Lucía I.'s Voki. Ok
- Carolina M.'s Voki. Ok
- Inés M.'s Voki. Ok
- Esperanza V.'s Voki. I don't understand the message!
- Guillermo G.'s Voki. ???
- Carlos T.'s Voki. Ok
- Marco W.'s Voki. ???
- Diego F.'s Voki.
- Javier L.'s Voki.
- Miguel C.'s Voki . Ok
- Guillermo A.'s Voki. Ok
- Jorge L.'s Voki. Ok.
- Marina R.'s Voki. Great!
- Ismael S.'s Voki. Ok
- Rafael M.'s Voki. Ok
- Daniel G.'s Voki. Ok
- Pablo Bra.'s Voki. Ok. Peace!
- Alex M.'s Voki. Ok
- Juan V.'s Voki. Ok
- Nicolás Z.'s Voki. Ok
- Manuel del A.'s Voki. Excellent!
- Lucía S.'s Voki. Ok
- Laura G.'s Voki. Ok
- Ana C.'s Voki. Ok
- Milena O.'s Voki. Ok
- Jose María V.'s Voki. Ok
- Almaz M.'s Voki. Ok
- Nahum C.'s Voki. Ok
- Miguel G.'s Voki. Ok
- Marta V.'s Voki. Ok
- Eduardo A.'s Voki. Ok
- Lucía G.'s Voki. Ok
- Hugo C-'s Voki. Ok
- Claudia L.'s Voki. Very good!
- Pablo Be.'s Voki. Ok
- María Luz F.'s Voki. ???
- Erika P.'s Voki. You recorded your voice! Great!
- Joe's Voki. Good advice though it is not one of the signs stuck on the wall.
- Ignacio Z.'s Voki. Great! I love hearing your voices!
- Miguel G.'s Voki. Ok, although it is not one of the signs on the wall!
- Otman E.'s Voki. Ok.
- Yasin A.'s Voki. Very good!
- Héctor L.'s Voki. I don't understand!!! Please, change the message!. Héctor, you haven't changed anything in the new link you've sent me! It's the same one.
- Fabiana B.'s Voki. Hello Fabiana. You have to continue with the message!.
- Inmaculada R.'s Voki. Ok, now with your own voice!!
- Bilal E.'s Voki. Ok
- Steven V.'s Voki. Hello Steven. You have to complete your message!
- Carla V.'s Voki. Ok
- María Ángeles' Voki. Where is it?
Wednesday, October 24, 2012
Safety in the laboratory and in the workshop
Click the image to open the pdf file:


After choosing one of the posters, you will have to create a VOKI to explain your chosen workshop rule to your classmates. You can write the message or (much better) record your voice (of course, in English).
TASK

After choosing one of the posters, you will have to create a VOKI to explain your chosen workshop rule to your classmates. You can write the message or (much better) record your voice (of course, in English).
To create a Voki account (and an email account, if you haven't got one), please, follow the instructions given in class to preserve your anonymity. I will know who you are.
When the Voki is done, please, send the URL (get the Voki link-copy-paste) using a comment in this post, my email or using the "Contact with the teacher" page.

Saturday, October 13, 2012
Signs
There are four types of signs:
Mandatory signs:
Tell you to use the correct type of protection to avoid accidents. This protection is obligatory. >BLUE CIRCLES

Danger (hazard):
Warn of possible dangers when you use certain materials or tools. >YELLOW TRIANGLES

First aid and Emergency:
Help and give information about first aid and equipment and emergency exits. > IN GREEN and IN RED FOR FIRE


Prohibition:
Forbid certain activities that put your health and others' health at risk. >RED CIRCLES WITH A LINE THROUGH THE PICTURE

Reviewing health and safety rules

- Be safe, not like Ed the Handyman.
- How many unsafe practices can you identify? The animation shows a series of Health and Safety problems. Look at the animation carefully and describe all the problems you see.
- Workshop safety rules.
- What is Ed doing wrong?
- How is Ed using the drilling machine?
- What is wrong with the workstation being used by Ed?
- What is wrong with the use of the fretsaw?
- What is wrong with this type of behaviour in a workshop?
- Why is it important to follow instructions given by the teacher regarding machines?
- Is Ed fit to work in a workshop?
- Is Ed using a chisel and mallet safely? - Sensible Ed using a chisel and mallet
- How Ed is using a hammer.
Eds's Health and Safety - V. Ryan © 2003-2009
Thursday, October 11, 2012
Health and Safety rules

These are some GENERAL HEALTH AND SAFETY RULES:
(Specific ones will be provided before using each tool and machine).
BEHAVIOUR
- NO "horseplay" or "fooling around" is permitted. Do not run in the workshop, you could ‘bump’ into another pupil and cause an accident.
- Bags should not be brought into the workshop are as people can trip over them so, leave them in the table area.
- Avoid Distractions. Distractions are a part of everyday life. When you are distracted while in the middle of performing an action with a power tool, remember to always finish the cut or the solder to a safe conclusion before dealing with the distraction. Taking your attention away from the working tool is a recipe for disaster.
- Too much noise makes people irritable and aggressive and interrupts concentration. Try to work quietly.
- Always wear safety equipment and wear appropiate clothing. Safety goggles, gloves etc., should be worn due to hazards that may be encountered while using tools.
- Long hair must be tied back when working in the workshop.
- Don't wear necklaces, rings or loose-fitting clothes - they may get caught in the machines.
- Keep your hands clean and dry.
- Tools can be dangerous. Never play with them. The greatest hazards posed by hand tools result from misuse and improper maintenance.
- Find out how to use each type of tool, equipment and machine correctly before you start. Don't work with tools, equipment or materials you don't know how to use.
- Use the right tools for the right task.
- Make sure tools are in perfect condition before you use them (check they aren't broken, the handles are secure and that safety elements are in place).
- Keep hands away from moving/rotating machinery.
- Use hand tools carefully, keeping both hands behind the cutting edge.
- Put your tools away while you are not using them.
- Clean all equipment and return it to the storage area before leaving the workshop area.
SIGNS
Obey signs. There are four types of signs:
- Mandatory
- Danger (hazard)
- First aid and emergency
- Prohibition
VERY IMPORTANT:
- Always listen carefully to the teachers (Rosa and Kostyn) and follow instructions. When learning how to use a machine, listen very carefully to all the instructions given by the teachers. Ask questions, especially if you do not fully understand.
- While working, ask the teacher again if you have any doubts.
- Always be patient, never rush in the workshop.
- Report any accident or injury to the teacher immediately (cuts, dust in your eyes, burns...).
More information:
Hand and Power tools.
Organisation of workshop activities

THE COORDINATOR
He/she is the responsible for organising the work of each group member to achive efficient teamwork. This person represents the group but it's not the chief or the boss.
THE PERSON RESPONSIBLE FOR THE MATERIAL
He/she collects the material needed for the work and is also in charge of recycling leftover material.
THE PERSON RESPONSIBLE FOR THE TOOLS
He/she looks after the tools assigned to the group to make sure they are not lost or damaged.
THE SECRETARY
He/she collects, checks and organises all the written documents from each group member (plans, drawings, estimates...) and writes the diary.
THE PERSON RESPONSIBLE FOR HEALTH AND SAFETY
He/she makes sure that the group members follow the health and safety rules in the workshop and when using tools.
THE PERSON IN CHARGE OF CLEANING
He/she makes sure each workstation is left completely clean.
Monday, October 8, 2012
Your tasks: Card games - Reviewing Technological Processes
Card games - Reviewing Technological Processes on PhotoPeach
You will find all the information about these CLIL activities in TP page.
You will find all the information about these CLIL activities in TP page.
Monday, October 1, 2012
Analyzing a technological object

If you want the pdf file for this poster from Centre de Développement Pédagogique, Canada, click the image.
Sunday, September 30, 2012
Technological Project

Definition of a technological project:
The different
activities carried out since one problem arises until we are able to solve it.
This method of work consists of the following steps:
This method of work consists of the following steps:
- NEED
Define the problem: the situation that need to be solved is clearly defined. - IDEA
Look for solutions: searching for information, analyzing similar objects, raising different solutions and choosing the most appropriate one. - DEVELOP THE IDEA
Design the object: in this step the idea is set and it is described in written and graphic form. - PLAN THE CONSTRUCTION
Planning: it has to do with anticipating the jobs that are going to be carried out, handing out the job, obtaining the materials and preparing the tools. - CONSTRUCTION
Construction: it is necessary to manufacture the different parts separately and later put them together. - CHECK
Evaluation: one tests how the object works and corrects the design if necessary. - TECHNICAL REPORT
Communication of results: it is necessary to present a technical report in which one describes the whole process.
Tuesday, September 25, 2012
Hardware: Input devices, processing and output devices
Clik the image to start the video and the activities:


Computers: Hardware and Software
In this topic we're going to study the fundamental parts of computers and what functions they have.
In general terms, the function of computers is to take in data that is inputted by peripherals (keyboard, mouse, stylus etc), process this data using a programme (software) and send it to the exterior again using another peripheral (printer, monitor, storage disk, etc.)
HARDWARE
The basics of computer hardware and what the hardware does inside the computer. Discusses RAM, hard drive and processor using a house metaphor.
SOFTWARE
A short explanation of how operating systems and programs work together to make computers useful and customizable.
Monday, September 24, 2012
Steps in the design process

If you want the pdf file for this poster from Centre de Développement Pédagogique, Canada, click the image.
Thursday, September 20, 2012

Wednesday, September 19, 2012
Monday, September 17, 2012
Technologies make your life easier
What is Technology? Where is Technology? Can we live without it?
Do you want the answer? Easy.

Turn off the electricity and water supply, disconnect the telephone and throw away your mobile. Wait just for 30 minutes.
How do you feel?
Answer this question in a comment in this article. Don't forget your course and name and the inicial of your surname.
This challenge should be done on Monday 24. If you have problems with your computer or the Internet, do it in your notebook.
This challenge should be done on Monday 24. If you have problems with your computer or the Internet, do it in your notebook.
 |
| Homer Simpson doing the challenge... after 2 minutes |
Sunday, September 16, 2012
Welcome students!
Starting a new highschool year in Pozuelo de Alarcón.
1st A, B, C and D: this year I am going to be your Visual Arts and Technologies teacher. Besides, I will be the hometeacher of some of you, so... I will be many hours with you.
The coundown is going to start:

This is going to be TECHNOLOGIES - 1ST ESO:
1st A, B, C and D: this year I am going to be your Visual Arts and Technologies teacher. Besides, I will be the hometeacher of some of you, so... I will be many hours with you.
Hope we have a great time learning together!
The coundown is going to start:
We are not going to use any text book. This blog is going to be our 2.0 WebBook. Are you ready?
This is going to be TECHNOLOGIES - 1ST ESO:
Subscribe to:
Posts (Atom)