Wednesday, October 9, 2013
Friday, July 5, 2013
Construction roles - Documentary

Today I've seen an excellent documentary programme on TV2: "Los Oficios de la Construcción", and I've said: "My technologies students should see it!. It is 61 minutes of almost everything we have been studying this course. It would be a very practical review and extension!."
Los Oficios de la Construcción (2010)
Título original: Los Oficios de la Construcción (España)
Género: Documentales
Director: José Antonio Muñiz.
Duración: 61 minutos.
You can find here the full documentary. Go to 16' 50'' if you want to skip the first part of the TV programme.
Besides, while looking for it on YouTube, I've found some parts of it classified by roles. Actually, I don't know which ones were the first ones to be produced. Here you will find the links:
- Structuralia. Historia de los oficios 01. Presentación.
- Structuralia. Historia de los oficios 02. Jefe de obra.
- Structuralia. Historia de los oficios 03. Encofrador.
- Structuralia. Historia de los oficios 04. Pintura.
- Structuralia. Historia de los oficios 05. Soldador.
- Structuralia. Historia de los oficios 06. COEX. Operario de conservación y explotación de carreteras.
- Structuralia. Historia de los oficios 07. Topógrafo.
- Structuralia. Historia de los oficios 08. Maquinista.
- Structuralia. Historia de los oficios 09. Ferrallista.
- Structuralia. Historia de los oficios 10. Instalador.
- Structuralia. Historia de los oficios 11. Cantero.
- Structuralia. Historia de los oficios 12. Albañilería.
Sunday, June 30, 2013
September exam
STUDY!
- Technological Processes
- Computers
- Internet
- Graphic Expression
- Materials
- Electricity
- Structures
- Project
Remember you will find everything:
- On the right (lessons)

- On the top (interactive activities and games)
Don't forget to bring your technical drawing equipment!
Tuesday, June 18, 2013
Your technical reports
1st A: Miguel F. - Carlos T. - Guillermo G. - David S. - Jaime F. - Fabián M.
Monday, June 17, 2013
Your video-Projects!!!!!!!!!!!!!!!!!!!!!!!!!!!!
What about the videos of your robots RUNNING? Please, send them by email (video or link).
This PhotoPeaches have been DONE BY THE STUDENTS!
Robot!!!! on PhotoPeach -
1st C: Ignacio Z. - Bilal E. - Héctor L. - Miguel G.
Photos form our Project in Technology on PhotoPeach
1st A: Miguel F. - Carlos T. - Guillermo G. - David S. - Jaime F. - Fabián M.
The making of PullBee on PhotoPeach
1st A: Carolina M, Andrea P, Mariana S, Inés A, Sandra R, Andrea B
and a Prezi slideshow too!
Robot on PhotoPeach
1st B: Manuel del A. - Pablo Bra. - Hugo C. - Guillermo A. - Nahúm C.
Making of our robot on PhotoPeach
1st A: Lucía C. - Macarena F. - Paula H. - Lucía I. - Inés M.
Video: tinning and soldering
1st B: Marta V. - Jose María V. - Lucía G. - Claudia L. - Laura G. - Ana C.
 The robot on PhotoPeach
Tecnologies robot on PhotoPeach
This PhotoPeaches have been DONE BY THE STUDENTS!
Robot!!!! on PhotoPeach -
1st C: Ignacio Z. - Bilal E. - Héctor L. - Miguel G.
Photos form our Project in Technology on PhotoPeach
1st A: Miguel F. - Carlos T. - Guillermo G. - David S. - Jaime F. - Fabián M.
The making of PullBee on PhotoPeach
1st A: Carolina M, Andrea P, Mariana S, Inés A, Sandra R, Andrea B
and a Prezi slideshow too!
Robot on PhotoPeach
1st B: Manuel del A. - Pablo Bra. - Hugo C. - Guillermo A. - Nahúm C.
Making of our robot on PhotoPeach
1st A: Lucía C. - Macarena F. - Paula H. - Lucía I. - Inés M.
Video: tinning and soldering
1st B: Marta V. - Jose María V. - Lucía G. - Claudia L. - Laura G. - Ana C.
Tecnologies robot on PhotoPeach
Sunday, June 16, 2013
Your robots!

Disaster in the workshop
"When we heard: We are going to make a robot! We all thought wow!, that sounds like we are going to have a lot of fun and when Rosa explained us how to make the robot we all thought that's really easy so we started the robot.
The first days we were making the robot everything was going excellent but after about two weeks disasters started happening:
First the On-Off switch broke so we had to look for a new one, after some days se finally found one but all the wires on our robot have fallen so we had to start all over again.
When we had nearly finished the aluminium plate which hold the motor fell out of place so we had to take the wires out to finally get the plate back on its place.
When we finally fixed everything and put the wires on their correct places, our robot didn't move so we had to look for the problema and fix it.
So you might think building a robot it's easy but actually it isn't"
Macarena F. 1st ESO A. June 2013
Friday, June 14, 2013
FINAL EXAMS FOR TECHNOLOGIES
Final exams, for those who failed Technologies, will take place in the Technologies workshop next
Wednesday, 19th - 8:30 - 10:00 h.
Here you are the lists with the students that will have to attend the exam.
If you are not in the "blacklist", your marks will only depend on the robot and the technical report.

|
Students
|
1st term
|
2nd term
|
3rd term
|
|
1st A (29 students)
|
|||
|
Lucía C.
|
Do this exam!
|
|
Do this exam!
|
|
Jaime F.
|
Do this exam!
|
|
|
|
Lucía I.
|
Do this exam!
|
|
|
|
Inés M.
|
Do this exam!
|
|
|
|
Students
|
1st term
|
2nd term
|
3rd term
|
|
1st B (26 students)
|
|||
|
Ana C.
|
|
|
Do this exam!
|
|
Juan V.
|
|
|
Do this exam!
|
|
Students
|
1st term
|
2nd term
|
3rd term
|
|
1st C (13 students)
|
|||
|
Mª Ängeles C.
|
Do this exam!
|
Do this exam!
|
Do this exam!
|
|
Bilal E.
|
|
|
Do this exam!
|
|
Miguel G.
|
|
|
Do this exam!
|
|
Carla V.
|
|
|
Do this exam!
|
|
Steven V.
|
|
|
Do this exam!
|
So...
STUDY!
1st term: Technological Processes - Computers - Graphic Expression - Project
2nd term: Graphic Expression - Materials - Electricity - Project
3rd term: Electricity II- Materials II - Structures - Internet - Project
Don't forget to bring your technical drawing equipment!
Saturday, June 8, 2013
The Technical Report

TECHNICAL REPORT
The technical report should include the following ítems:
0. Cover
Attractive cover with the names and course of the team.
1. Index
2. Introduction. Definition of the problem.
Design and manufacture an antiobstacle robot to be an insect. Explain the Project.
3. Insect Design.
3.1. Possible solutions (sketches). Insect sketches (choose the best ones). Authors.
3.2. Decision matrix (finalists insects sketches). Authors.
3.3. Final design (detailed sketch). Drawings and views of final insect. Authors.
4. Approach to construction.
4.1. Job distribution. Roles.
4.2. List of materials. Author.
4.3. Views of two important components (motor and SPDT swich). Choose the best ones in your team. Authors.
4.4. List of tools. Author.
4.5. Safe and health instructions. Author.
4.6. Clean instructions. Author.
4.7. Budget. You will not have this section.
5. Manufacturing
5.1. Diagram: circuit of the robot. Detail the color of each connection and who made it. Author.
5.2. Plan view of the robot with the connections (real positions in your robot). Author.
5.3. Manufacturing development: problems and difficulties found. Modifications of the original design. Incidents and accidents. Authors.
5.4. Construction Diary. Author.
6. Final Results and evaluation.
6.1. Results achieved: including pictures of the object and a description of it. Author.
6.2. Digital information about the Project: videos and pictures (YouTube and Photopeach links - no faces allowed, if you are there, edit the pictures and place a "monster" on your faces). Authors.
6.3. Evaluation: use a matrix to evaluate the members of the group (% each).
Of course, you can modify and adapt this index.
DEADLINE
- Next week (10-14th) - We are going to continue finishing the robot, taking the final pictures...
- Monday 17th - Robots should be finished to show everybody.
- Monday 17th and Tuesday 18th - You can give me the final technical report finished and printed.

On Wednesday 19th (final exams for those who have faild one or more Technologies terms) will be the LAST DAY to give me the technical report printed.
Wednesday, May 29, 2013
Structures
FORCES
Forces on technologystudent.com.
Do you remember Kostyn presentation?

Famous structures of the world
BRIDGES
Introduction to bridge type structures - HOMEWORK
The wood beam bridge
 The wood frame bridge
The stone slab bridge
The stone arch bridge
 Iron and steel bridges
Box girder bridges
Cable stay bridge and a suspensión bridge


Why triangulation?

 Examples of triangulation.
Wood or Steel?
Triangulated roof.
Frames structures.
Forces on technologystudent.com.
Do you remember Kostyn presentation?
Famous structures of the world
BRIDGES
Introduction to bridge type structures - HOMEWORK
The wood beam bridge
The stone slab bridge
The stone arch bridge
Box girder bridges
Cable stay bridge and a suspensión bridge
Why triangulation?


Wood or Steel?
Triangulated roof.
Frames structures.
Saturday, May 25, 2013
Monday, May 20, 2013
Your tasks about METALS
This is a mix of your tasks about METALS based on Metal test cards.
Don't forget about this task! You have to send the finished file by email.
Don't forget about this task! You have to send the finished file by email.
Tuesday, May 14, 2013
Working with METALS
HOT FORMING PROCESSES
Visit Metal extrusion manufacturing in Tecno 12-18.
COLD FORMING PROCESSES
- FOUNDRY
Visit Metal extrusion manufacturing in Tecno 12-18.
- FORGING
COLD FORMING PROCESSES
- STAMPING - Visit Stamping in Tecno 12-18.
- DRAWING - Visit Drawing in Tecno 12-18.
- DIE-CUTTING AND PUNCHING - Visit Die-cutting and punching in Tecno 12-18.
- BENDING - Visit Sheet metal bending in Tecno 12-18.
- TURNING - Visit Turning in Tecno 12-18.
Sunday, April 28, 2013
Project: How to connect the antennas
More information
And more
This is the cool part of the design!

You will need:
1.- Components and Materials:
And more
This is the cool part of the design!

You will need:
1.- Components and Materials:
- wire for the antennas
- 2 x faston terminals (electrical connectors) (option 1)

- Heat shrink that will fit over the wire and the faston connector (option 1) or SPDT terminal and wire (option 2).

- Pliers. Use the pliers to press down on the terminal connectors to hold the wire and the SPDT terminal tight. You could need some glue or soldering.
- Glue gun
- Lighter
Saturday, April 27, 2013
Project: Placing the support and traction elements of the robot
The back caster
More information
You will need:
1.- Materials:
Motor grip
More information
The shaft of the motor is the rim and the heatshrink is the tire. Since the robot rests on the shaft of the motor to move around, you will need some grip.
Option 1: You will need to shrink the heatshrink onto the motor shaft. We can use a heat gun, a lighter or the tip of your soldering iron.

You will need:
1.- Materials:
More information
You will need:
1.- Materials:
- 1 x big paper clip (or some wire)

- 1 x plastic or wooden pearl.


- Pliers
- Glue gun
Motor grip
More information
The shaft of the motor is the rim and the heatshrink is the tire. Since the robot rests on the shaft of the motor to move around, you will need some grip.
Option 1: You will need to shrink the heatshrink onto the motor shaft. We can use a heat gun, a lighter or the tip of your soldering iron.

You will need:
1.- Materials:
- Heat shrink that will fit over the motor shaft.

- Lighter
- Scissors
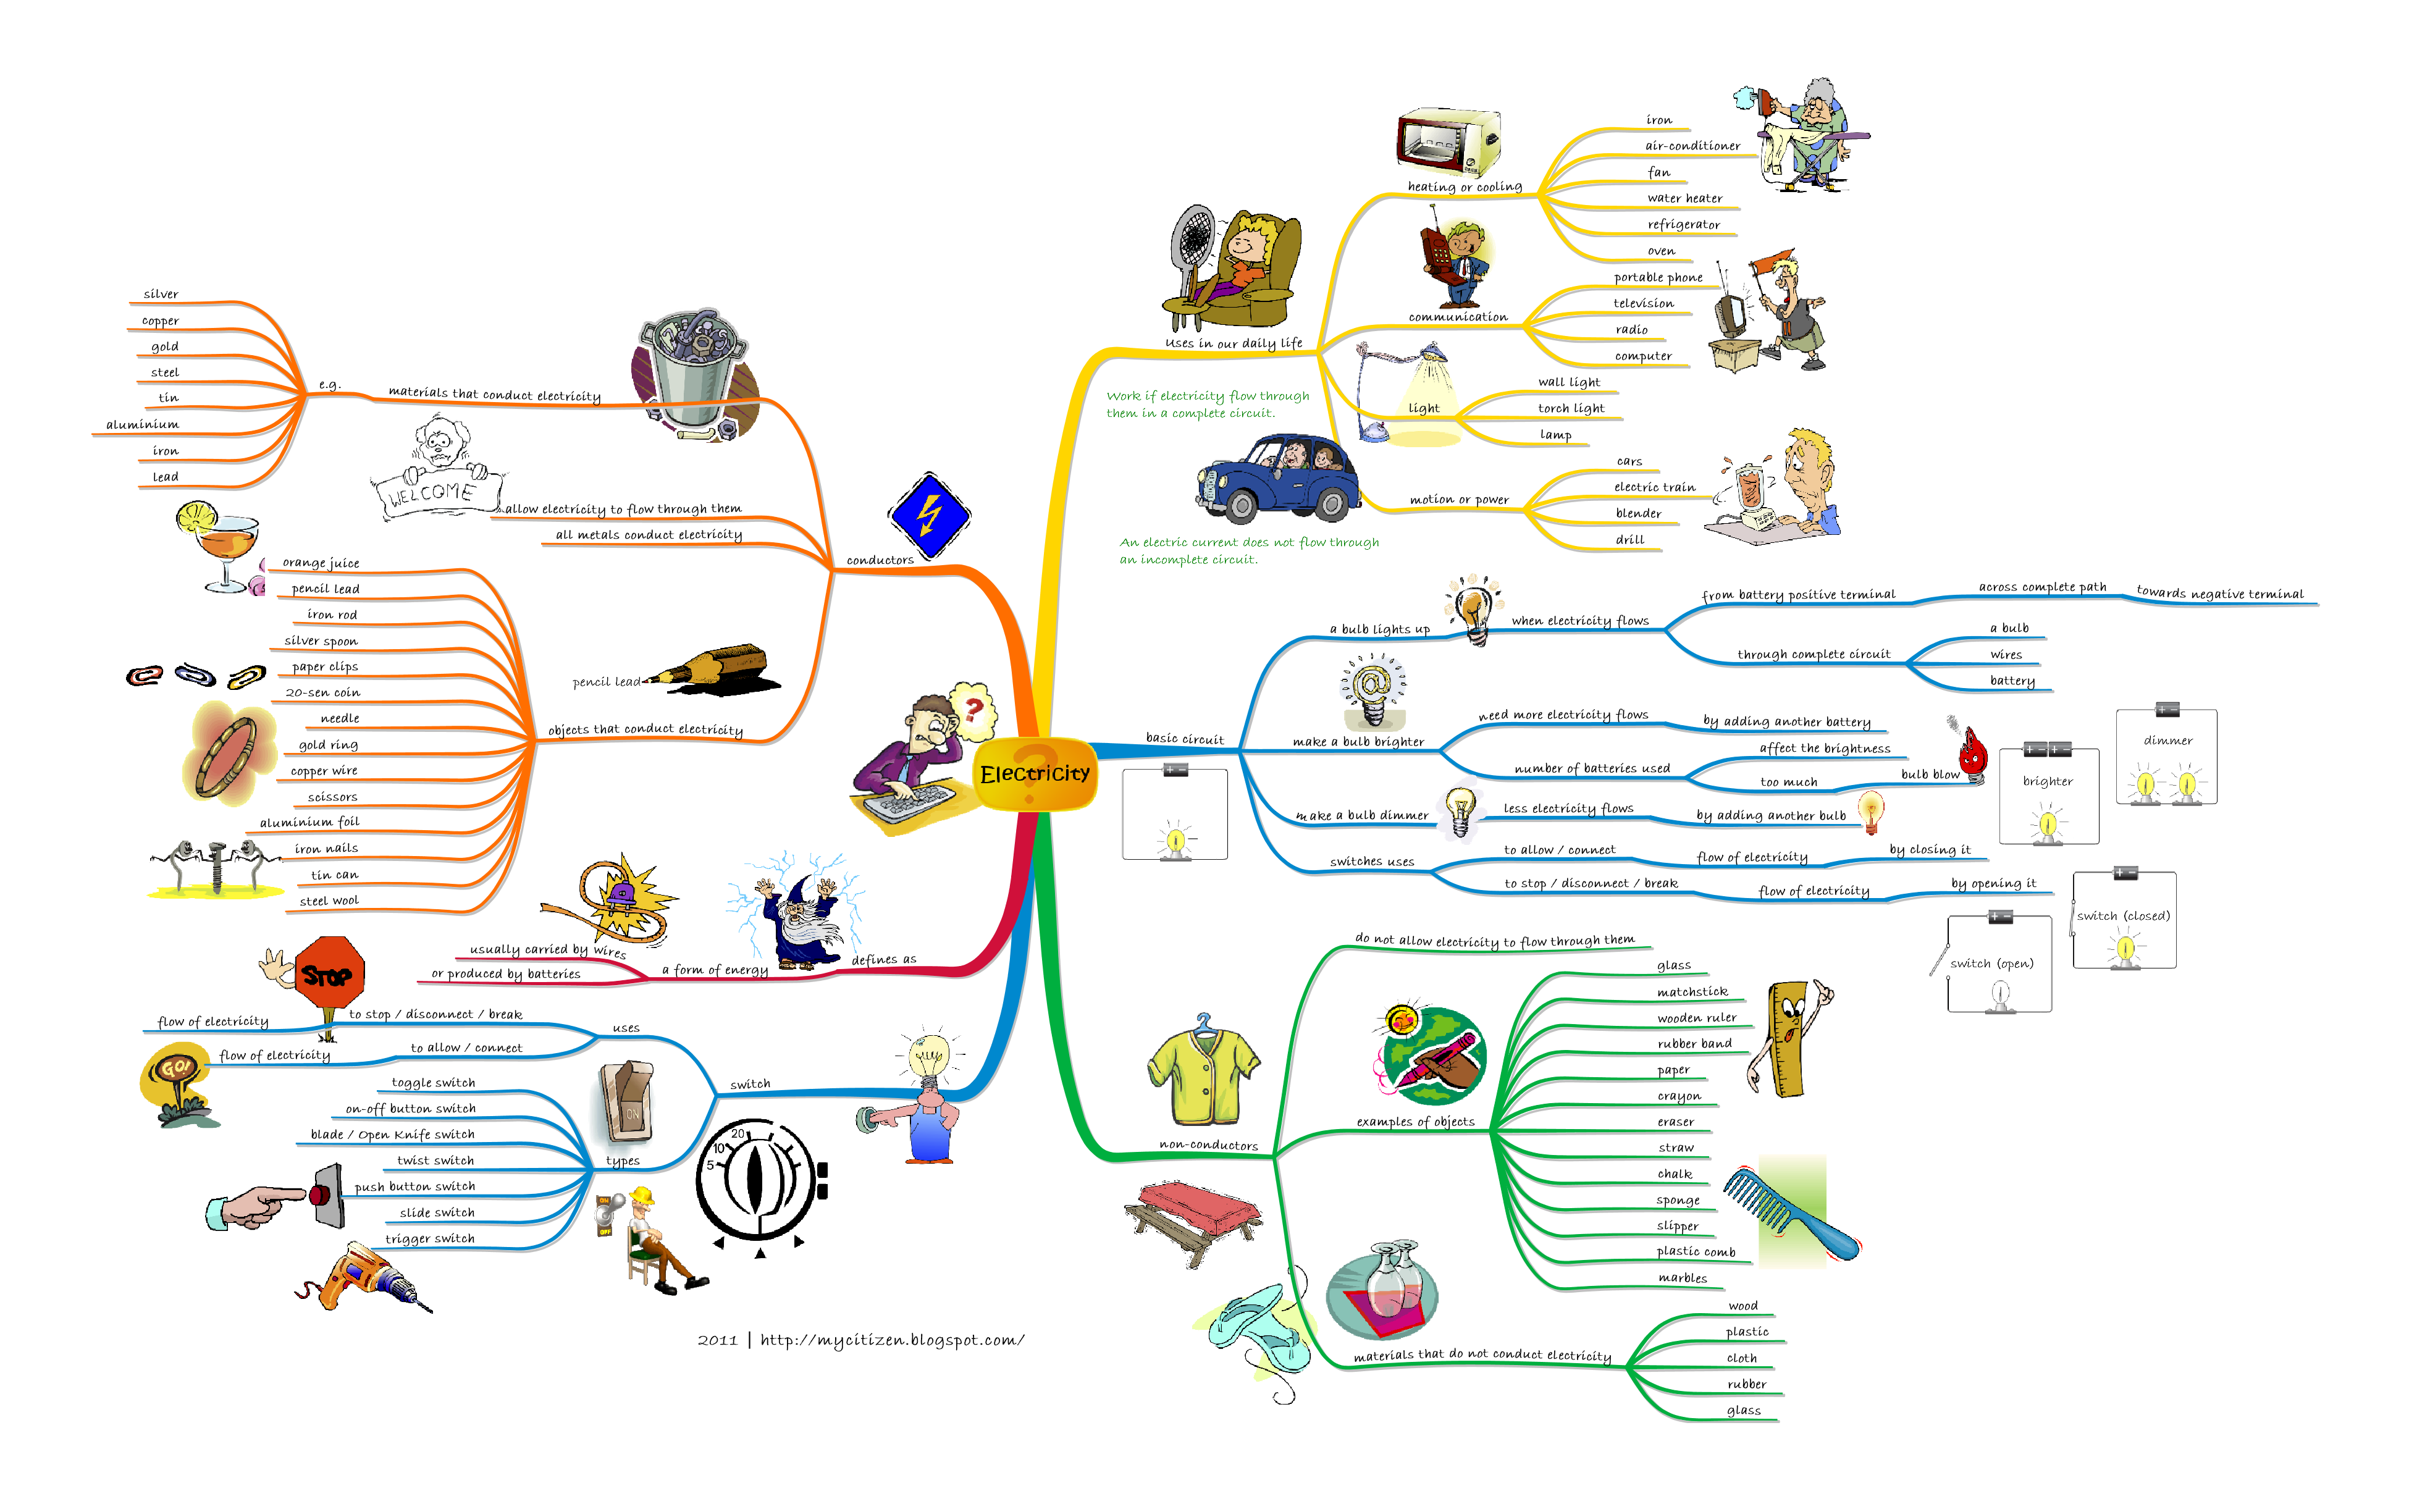
Electricity review

Original image to zoom in: http://c665149.r49.cf2.rackcdn.com/images/support/gallery/galleryimages/maps/Education3.png
From iMindMap Gallery
Wednesday, April 3, 2013


Project: How to connect the elements of the circuit
1.- Materials
- Tin

- Wire


2.- Recommended Tools:
- 1 x soldering iron

- 1 x wire stripping tool

- 1 or 2 x pliers

- 1 x tweezers


- The soldering iron and the tin have to be holded by the same student.

- Tinning the end of the wires and contacts. Once you have tinned both parts, you are ready to solder them together.
SPDT Switches
Soldering the SPDT switches I (1. NC with NC and 2. NO with NO)
Soldering the SPDT switches II (3. C with Motor and 4. C with Motor)
Soldering the SPDT switches III (5. (+) battery holder with NC and 6. (-) battery holder with NO) On your AA battery holder you have a red and a black wire. The red wire is positive ( + ) and the black is negative ( - ).

9.- Switch with battery holder.

Solder the wire like on the picture and everything is ready to be tested.
Put some battery in it (3 AA batteries)
Both motors should turn.
By pressing the left SPDT switch the left motor should turn the other way.
By pressing the right SPDT switch the right motor should turn the other way.
Put some battery in it (3 AA batteries)
Both motors should turn.
By pressing the left SPDT switch the left motor should turn the other way.
By pressing the right SPDT switch the right motor should turn the other way.
If they don't, CHECK EVERYTHING!
Subscribe to:
Posts (Atom)