Showing posts with label task 2012/2013. Show all posts

Tuesday, January 14, 2014

PLE - Personal Learning Enviroment

A Personal Learning Enviroment... Not only for teachers!!! 

PLE - Personal on PhotoPeach

PLE - Highschool on PhotoPeach
 

PLE - Making of on PhotoPeach


Esta actividad se presentó en las pasadas V Jornadas iTIC 2013 que tuvieron lugar en el CRIF Las Acacias.


También ha sido publicada por la Revista Digital Educamadrid.


Saturday, June 8, 2013

The Technical Report

TECHNICAL REPORT

The technical report should include the following ítems:

0. Cover
Attractive cover with the names and course of the team.

1. Index

2. Introduction. Definition of the problem.
Design and manufacture an antiobstacle robot to be an insect. Explain the Project.

3. Insect Design.
3.1. Possible solutions (sketches). Insect sketches (choose the best ones). Authors.
3.2. Decision matrix (finalists insects sketches). Authors.
3.3. Final design (detailed sketch). Drawings and views of final insect. Authors.

4. Approach to construction.
4.1. Job distribution. Roles.
4.2. List of materials. Author.
4.3. Views of two important components (motor and SPDT swich). Choose the best ones in your team. Authors.
4.4. List of tools. Author.
4.5. Safe and health instructions. Author.
4.6. Clean instructions. Author.
4.7. Budget. You will not have this section.

5. Manufacturing
5.1. Diagram: circuit of the robot. Detail the color of each connection and who made it. Author.
5.2. Plan view of the robot with the connections (real positions in your robot). Author.
5.3. Manufacturing development: problems and difficulties found. Modifications of the original design. Incidents and accidents. Authors.
5.4. Construction Diary. Author.

6. Final Results and evaluation.
6.1. Results achieved: including pictures of the object and a description of it. Author.
6.2. Digital information about the Project: videos and pictures (YouTube and Photopeach links - no faces allowed, if you are there, edit the pictures and place a "monster" on your faces). Authors.
6.3. Evaluation: use a matrix to evaluate the members of the group (% each).

Of course, you can modify and adapt this index.


DEADLINE
  • Next week (10-14th) - We are going to continue finishing the robot, taking the final pictures... 
  • Monday 17th - Robots should be finished to show everybody.
  • Monday 17th and Tuesday 18th - You can give me the final technical report finished and printed.
 
On Wednesday 19th (final exams for those who have faild one or more Technologies terms) will be the LAST DAY to give me the technical report printed.

Saturday, February 2, 2013

Electricity


We normally get electricity from the mains or batteries.
A circuit is a complete route or course. An electrical circuit has electricity flowing throught it. Electricity only flows when the circuit is complete with no gaps.

Electricity
What is electricity? Power Up!. By UK Power Networks. Under 11.
Electricity. Power Up! By UK Power Networks. Over 11.
 
Symbols:
 

Monday, December 17, 2012

Project: NEED and IDEA. Insects

You already know that the project for this course is going to be a robot. Juan (another technologies teacher) has been working hard in a prototype and now we got it. It works!. So now, we have to begin our process step by step.


NEED
Our first need is to design a COSTUME for the robot. We, the teachers, have analysed the need or problem and we have agreed to construct an INSECT. So, the first thing you have to do is to STUDY INSECTS, their anatomy, types of insects, colors, shapes... 


Insect anatomy scheme, by Piotr Jaworski, PioM; 17 V 2005r., POLAND{{cc-by-sa-2.0}}

Parts of an insect.:
- Head
- Thorax
- Abdomen
1  - Antenna
4  - Compound eye
11- First wing
12- Second wing
23- Tarsus
24- Tibia
25- Femur
26- Trochanter


IDEA
In this stage you will have to propose one or several solutions and begin thinking about materials. Your team will have to agree and choose the best solution to be built.

Measuring with a ruler and a caliper

Measuring with a ruler:


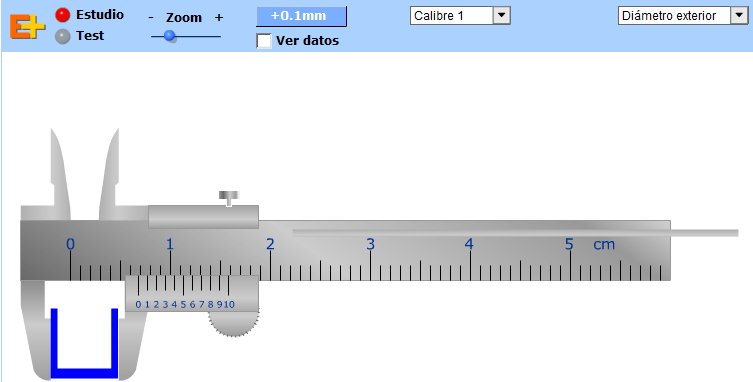
Measuring with a caliper:


  • Photocopy using a caliper. When finished and corrected, stick it in your notebook.
  • Calibre, in Educaplus.org. First, go to "Estudio", then do the "Tests".
  • Now you are ready to do the following task:

1,5Volts motor and an SPDT (single pole double throw) switch with a metal lever
  1. Perspective views > Measure the pieces and take notes over your sketches.
  2. Views > Dimmension the views of the pieces over the sketches. Remember you must not repeat dimmensions.
  3. Finally, you will have to create a FAIR COPY (use rulers, compass, 2H pencil, black feltpen) of the views with dimmensions. Use an appropriate scale for your drawings.
Do a good job. These documents will be part of your final Technical Report!

Tuesday, December 4, 2012

The first parts of your Robot!

REALIA
Now you are ready to do the following task:
1,5Volts motor and an SPDT (single pole double throw) switch with a metal lever
  1. Sketching of some pieces of your future ROBOT! Do perspective views.
  2. Sketching views (front, plan and side views) of the same pieces.
Do a good job. These documents will be part of your final Technical Report!

Isometric perspective drawing

Templates for isometric perspective drawings


Wednesday, November 28, 2012

Views of objects

Views of objects = Orthographic Projection = Dihedral System (Sistema diédrico)

European System


REALIA:
Easy 3D model to understand how views are obtained:

Ortographic Views - European system on PhotoPeach


Monday, November 12, 2012

Basic drawing tools and materials

 
REALIA:


VOCABULARY TASK
  • Vocabulary exercises 1, 2 and 3. Just in case you need a new copy. Use links above to complete the exercises. Common office equipment is not in these pages, so do it by yourself or search on the Internet (I think they are only 3 or 4 items). Please, only short and easy descriptions, remember you have to learn them. The deadline is December 10.

Paper sizes

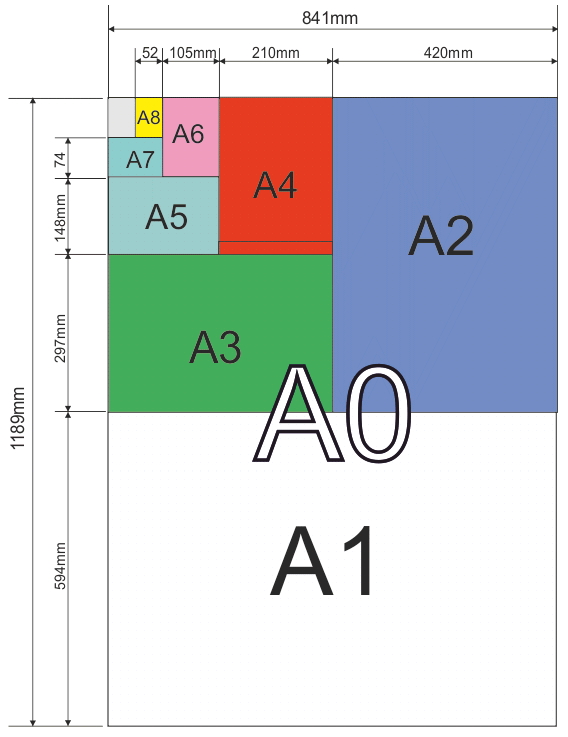
  • The International Standard ISO 216 (International Organization for Standardization), sets out the common paper sizes used around the world. 
  • 161 countries from around the world are members of the organisation.
  • The metric system of paper and card sizes are shown below. 
  • All ‘A’ sizes are double the previous size, with A0 being the largest.


  • Paper sizes task. page 3. Page 3 should be done in your notebooks.
  • REALIA: Craft Practice Using sheets of paper (A4). Create A3, A2, A1, A5, A6, A7... formats.

Wednesday, October 24, 2012

Safety in the laboratory and in the workshop

Click the image to open the pdf file:


TASK

After choosing one of the posters, you will have to create a VOKI to explain your chosen workshop rule to your classmates. You can write the message or (much better) record your voice (of course, in English).

To create a Voki account (and an email account, if you haven't got one), please, follow the instructions given in class to preserve your anonymity. I will know who you are.

When the Voki is done, please, send the URL (get the Voki link-copy-paste) using a comment in this post, my email or using the "Contact with the teacher" page.